A custom Wheel of Life is an excellent coaching tool, great for lead generation, and for onboarding clients.
Try the Wheel of Life yourself here (opens in a new window).
There are no paper or PDF printouts needed!
You can customize the wheel for any purpose: life balance, leadership, health, career growth, financial security, senior living, and so on.
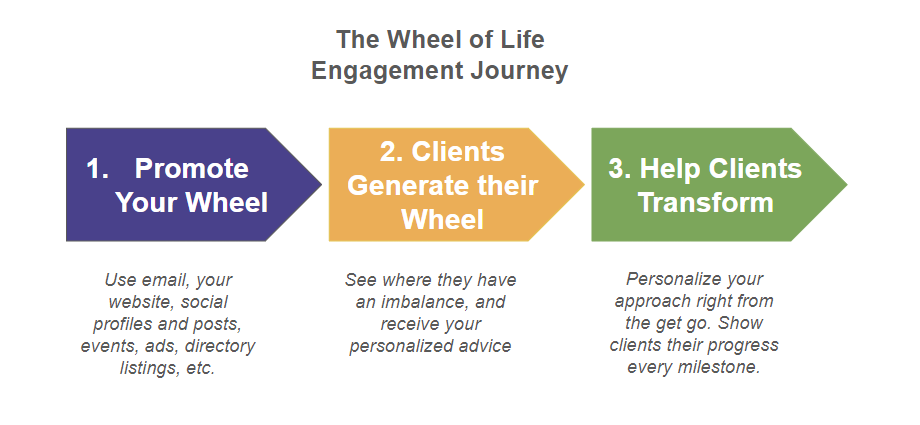
As clients take your wheel and determine where they stand on multiple dimensions of their life or business, they start thinking of working with you to achieve the transformation they need.
The wheel comes with goal setting and before-after snapshots to help you you track your clients’ progress.
Note: You can also use our DISC, Big 5 personality assessment, and Strength Finder templates. These assessments are proven by research and help you address your client needs in a holistic manner.
A customized wheel of life is tailored to your practice – you can bring your unique philosophy to the results and send people to your course or coaching package as appropriate.
The wheel can be embedded on your own website for a complete white labeled experience.
In this post we will show how to a customize our template and use it as an effective coaching tool.
As a result, you can then create your own custom Wheel of Life in as little as 10 minutes!
A Wheel of Life is very flexible because it can be tailored to any kind of application.
The online Wheel of Life can be used by a variety of coaches and consultants. Some of the many different applications of Wheel are:
Try these example Wheels (open in a new window):
Each of these comes as a template. So you can simply change your branding and start using it with clients in less than 10 minutes!
A wheel generally has 8-10 spokes to address both personal and professional aspects of one’s life or business.
The assessment helps measure the “current satisfaction” or performance. It takes only a few minutes to complete.
At the end of the exercise your clients can clearly see the areas of prioritization, and can decide how to make a change supported by a coach.
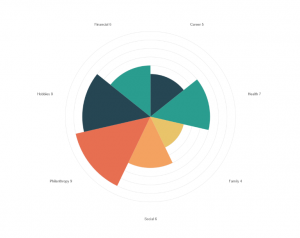
This makes for a very powerful and visual way of looking at the entire subject area at a glance.
Even though you may intuitively know what is out of balance in your life or business, having a snapshot like this is very powerful.
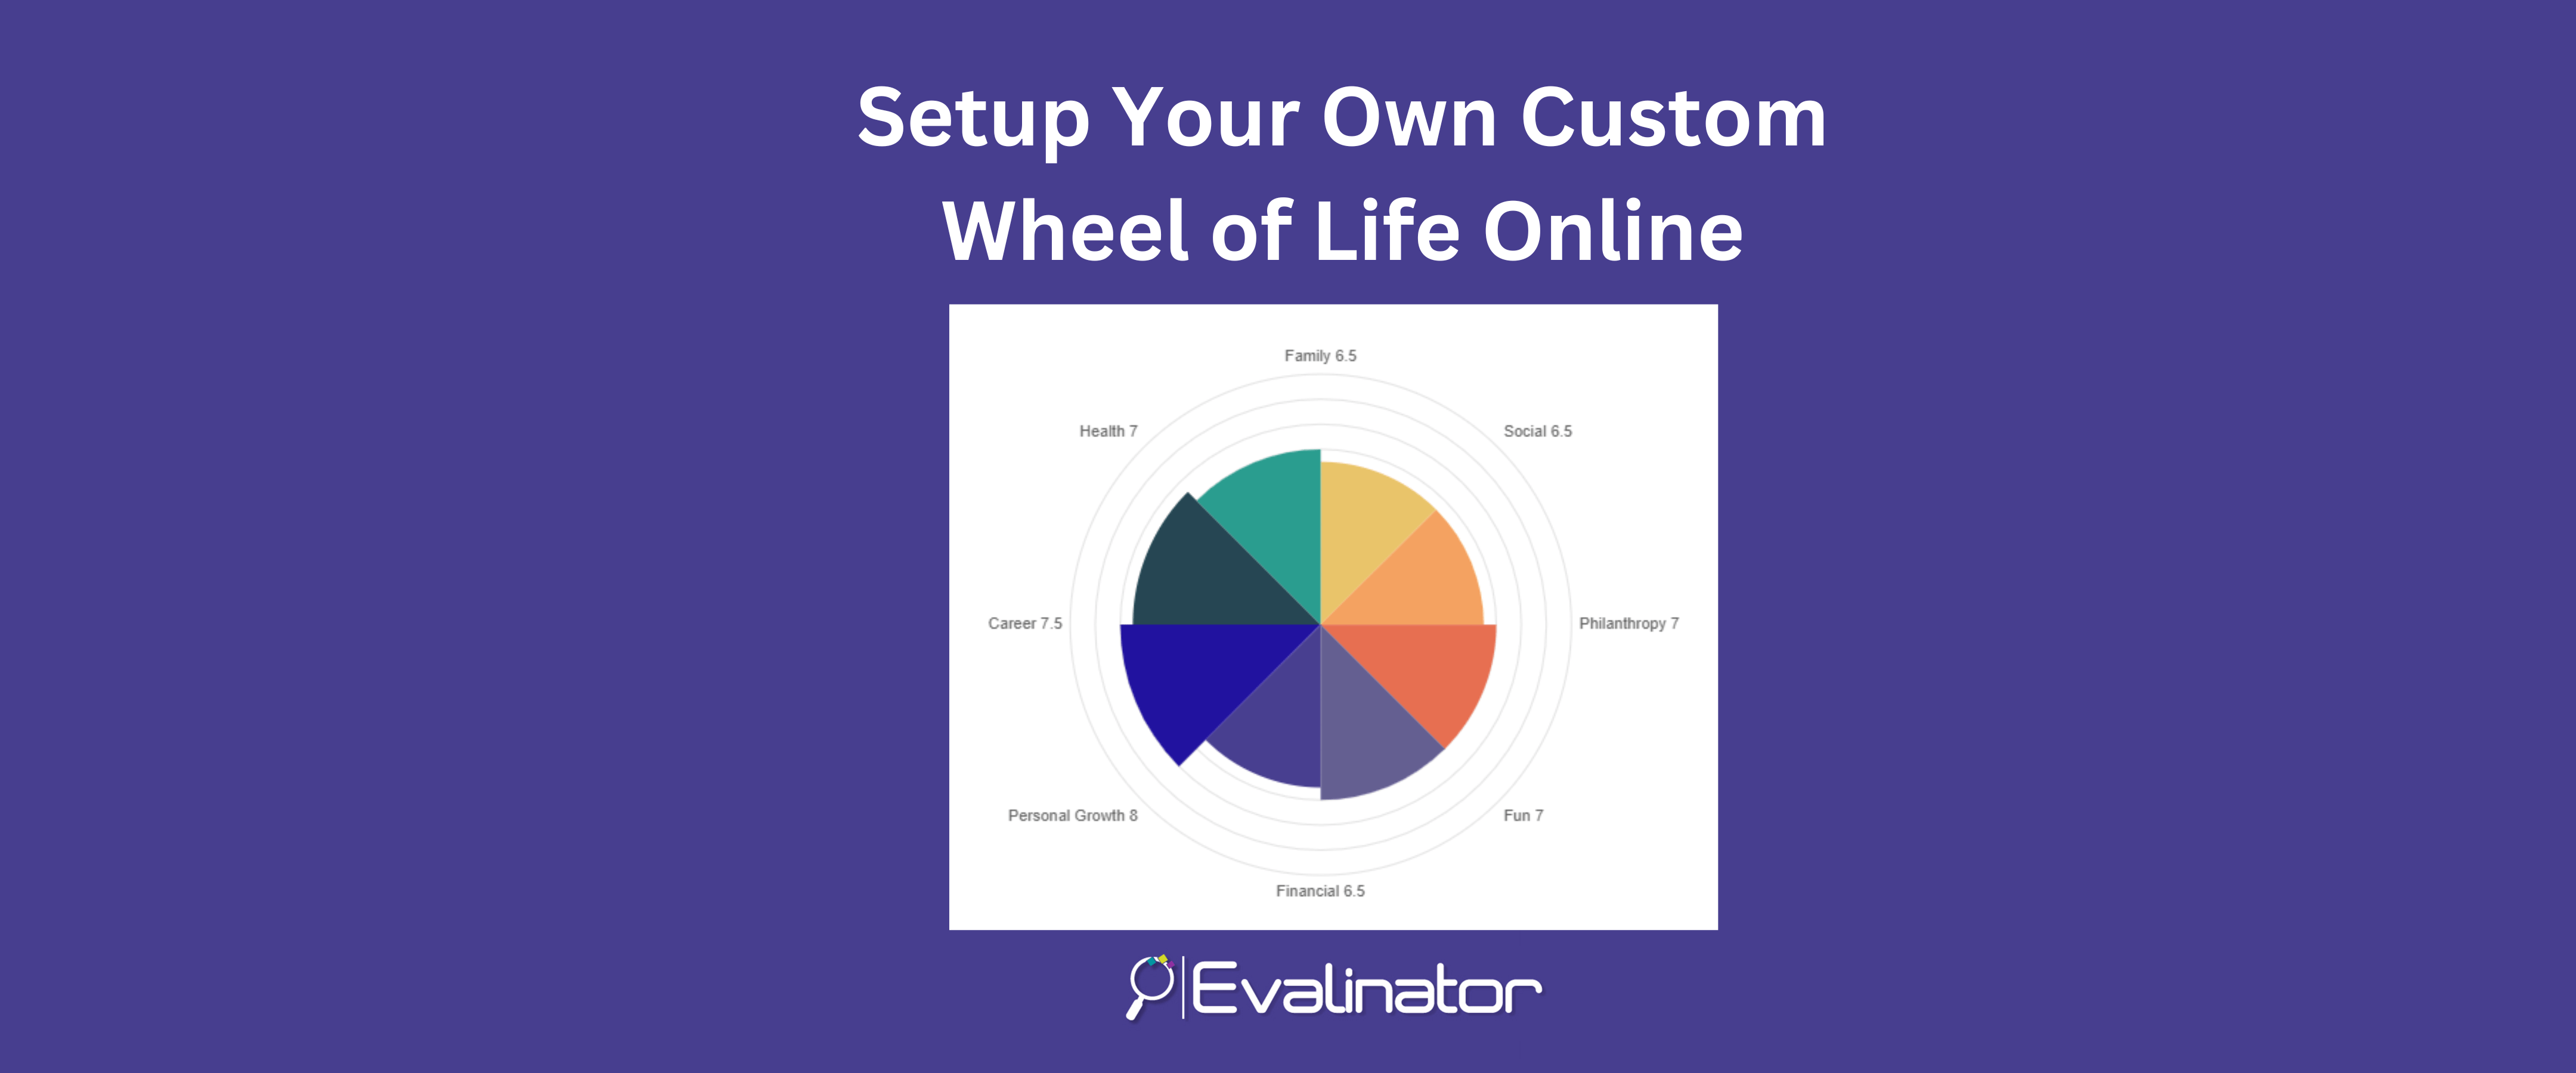
For example, this is what the results of a Wheel of Life look like. In this example, we can clearly see that both career and family are areas of concern. Perhaps they are connected, or perhaps something else is affecting these.
Once this assessment is taken, coaches then have a lot of flexibility in working with their clients. They can help diagnose and address the imbalance. Using the wheel, coaches and their clients can set the right goals and measure progress over time.
Sometimes you may have to use more detail upfront to make your wheel more actionable.
To achieve that you can add multiple questions inside each dimension or category.
For example:
A wheel with dimensions will automatically roll up the scores for each question up to the dimension.
You have the option to display only the dimension scores or display the scores for all the questions as well.
In addition, you can set goals at the dimension level, or keep them at a question level.
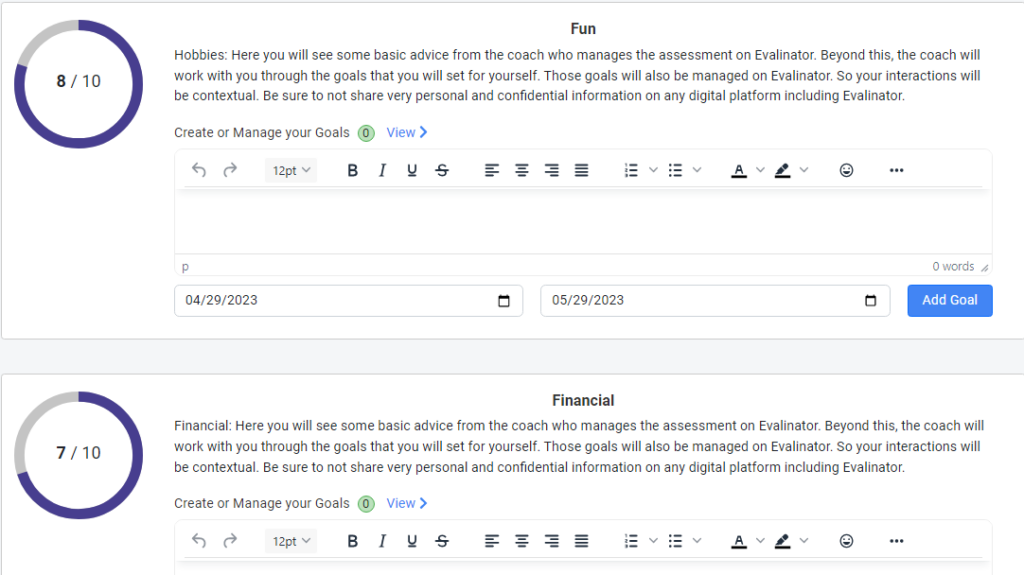
Evalinator offers some unique and multiple ways for you to work with clients. You can set goals for with your clients that reflect the actions they need to take over the next few days or weeks.
These goals can then be updated with comments so that you can have a fruitful discussion on the progress. It keeps your clients accountable.
Goals and their progress also help your clients see the progress that is being made. This is a very powerful reinforcement of the value they are getting by working with you.
Evalinator help you keep track of your clients’ progress.
But every so often you may want to show the clients how far they’ve come.
This is easy to do:
This is a great way to showcase the value that the clients have realized. So they are more likely to continue their coaching and stay engaged with you.
Evalinator provides a great way to create and customize your own wheel of life online and host it on your website. You can start with a Wheel of Life template and adjust it to your liking.
There is a 14 day free trial so you can try for yourself.
There are several templates available:
Or you can start from scratch to give yourself complete flexibility. Here’s how you may want to customize your Wheel of Life to personalize your approach for optimal customer experience.
Tip: When you first start creating, it’s best to just breeze through the various steps without deliberating too much. Once you see your Wheel of Life live, then you can go back and adjust things (edit questions, add images, refine descriptions etc.) to make it ready for primetime.
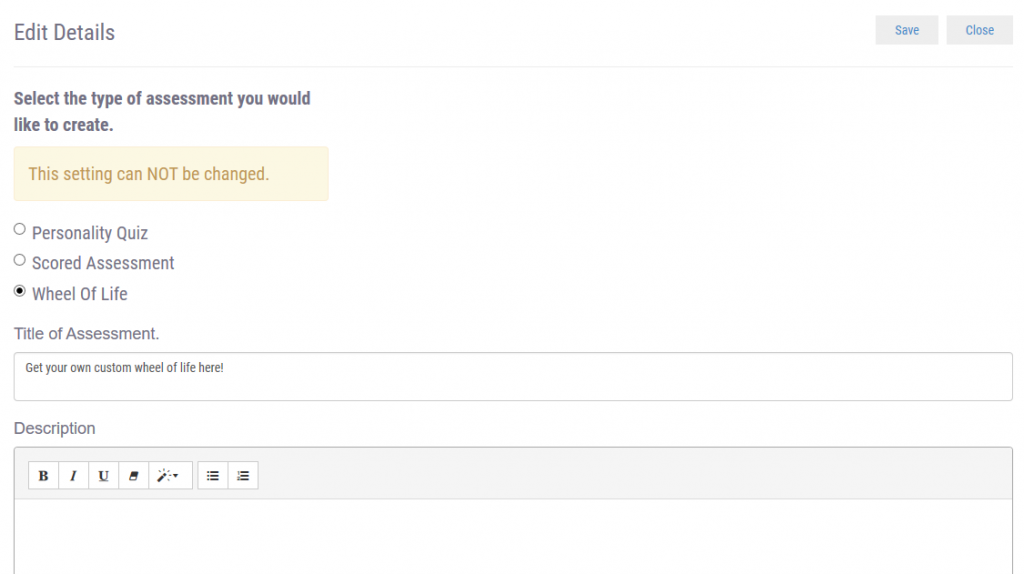
After signing in, hit the “create assessment” button. The first thing you’ll enter is the title. Be sure to select the “Wheel of Life” option. You can always edit all this later. Put in a nice catchy title that your audience will identify with.
Once you get through this step, you’ll begin to see a whole range of menu options on the top. We’ll walk through them next!

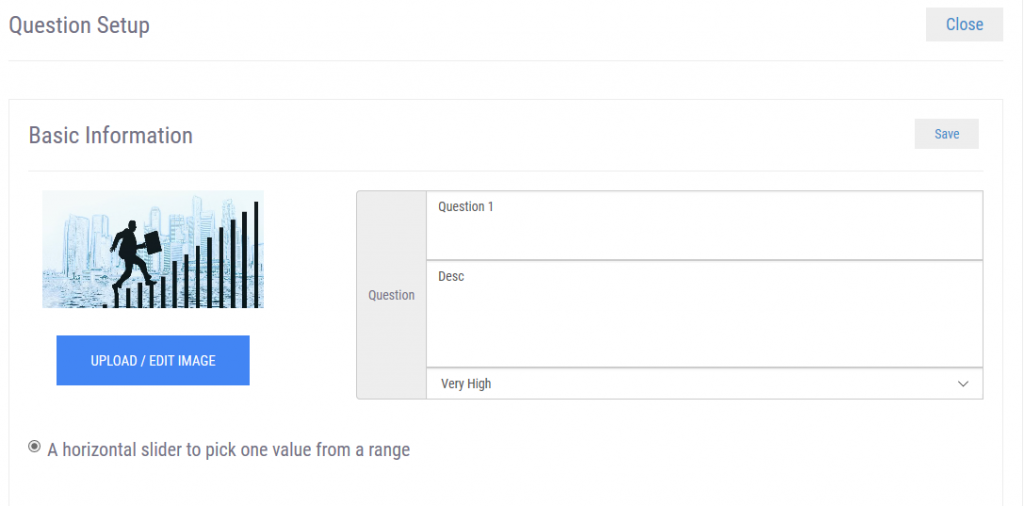
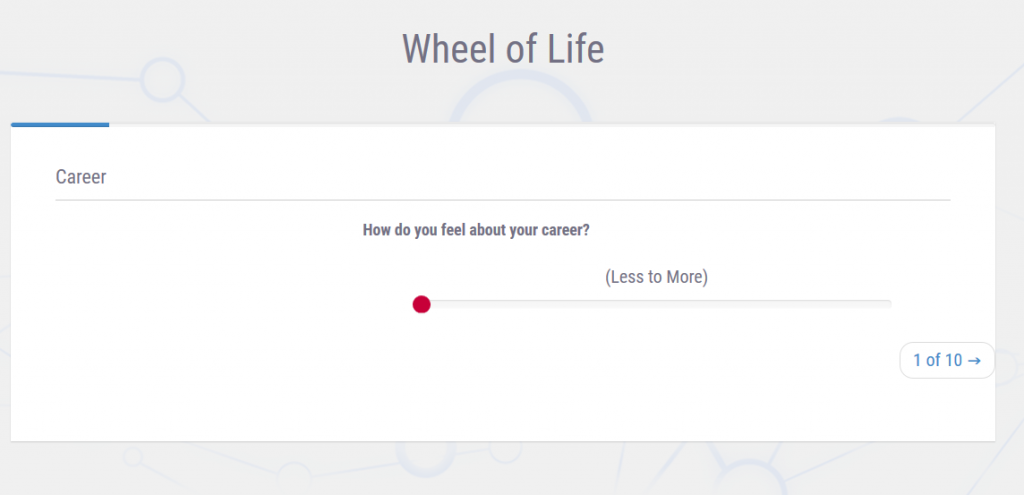
A typical wheel of life, shows each question and its score on the polar chart. You can set up each question in the “Questions” section. All you have to do is to enter a short phrase and then the actual question itself. For example: “Career” and “How happy are you with your career growth trajectory?”. These questions will then show up as a “Wheel of Life”.
It’s recommended you keep between 8-12 questions so as not to overcrowd the wheel.
For many coaches, it’s enough to set up these questions because it gets them to a point where they can begin the process of introspection and discovery with their clients.
A typical Wheel of Life is made up of “rating scale” type questions. For example, respondents choose their score on each question from 1 to 10.
However, there are cases where you have many more questions to ask because you want to present a more comprehensive picture. So you will want to have multiple questions that roll up into a single dimension. For example, you may have 3 questions under career, and 4 questions under family. For business coaches or consultants, these could be 3 questions on marketing, and 3 on technology along with several other dimensions.
This is where dimensions help.
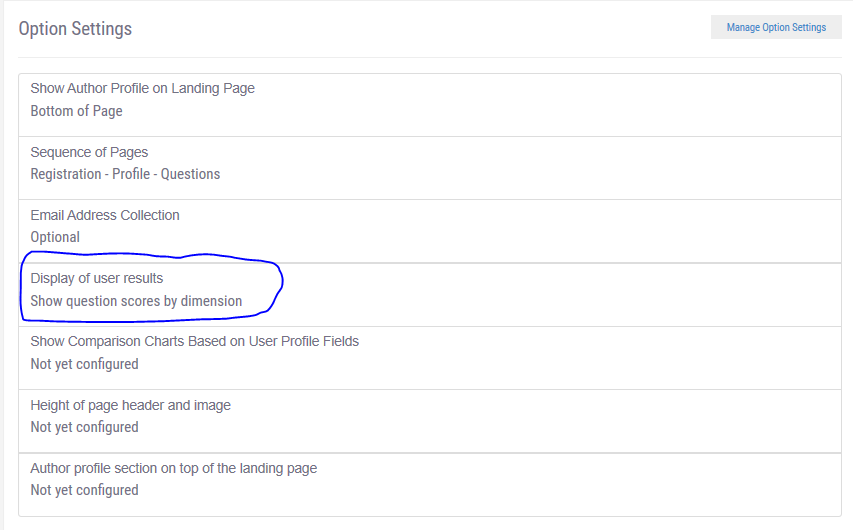
Doing this is easy. First, in the “options” section, select the option to show dimensions when the users see their results. Showing by dimensions means that questions will not be mapped to dimensions instead of their scores being shown on their own.
Now, in the “dimensions” section, set up your dimensions. These dimensions will show up on the polar chart, instead of each question.

Finally, when you set up your questions, select the dimension for each question. You can map more than one dimension to each question.
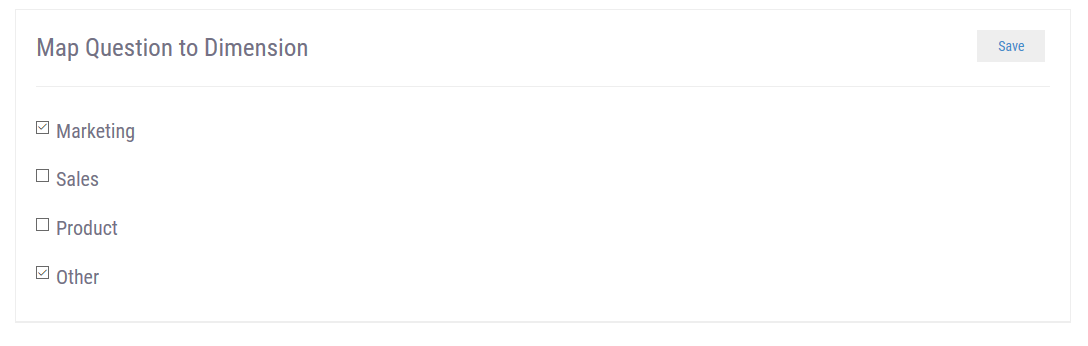
If there are multiple questions for a dimension, then an average of the scores will be taken.
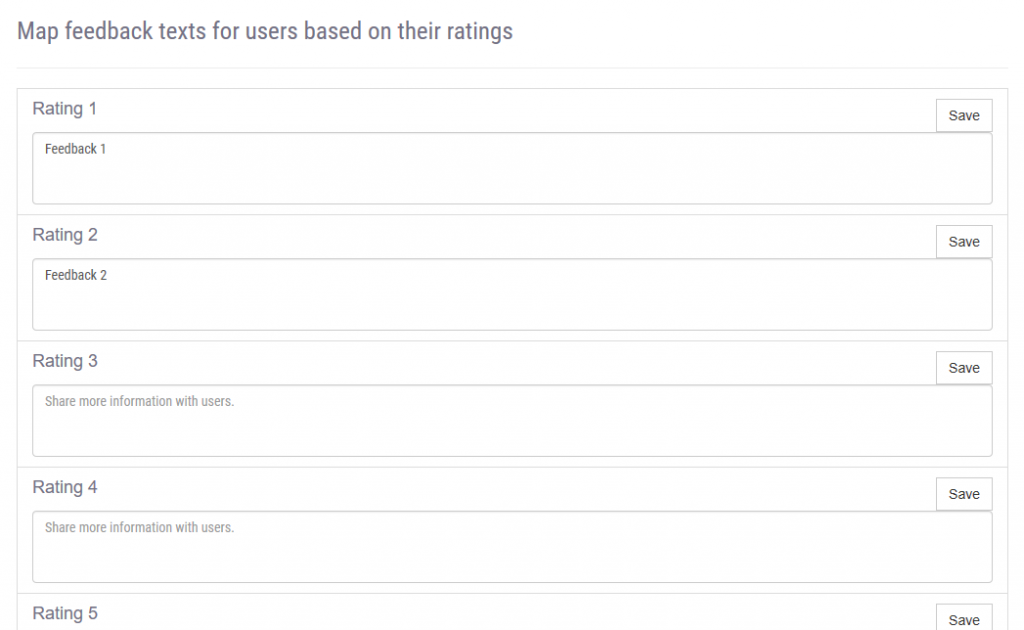
This is a really nice feature because as a coach you can now give some personal advice to your respondents. This advice also serves to build rapport and trust with a respondent who is not yet a client.
You do that in the feedback text section of each question. For each of the scores 1-10 you can specify personalized feedback. Practically, you may just want to do it by ranges. For example, a specific feedback for those scoring between 8-10 on a question, a different feedback for those scoring between 4-7, and then finally a different feedback text for those scoring 1-3.
As you think about your Wheel, you have these additional options.
Customizing all this is fairly simple.
These 4 simple steps above should help you create your custom Wheel of Life for multiple purposes – business, personal, and life coaches. Of course there are other settings too. To see the configuration “options” available to you, please look at this post. This post on The Coaching Tools Company also covers a Wheel of Life pretty comprehensively. Here’s our own guide to the wheel of life.
Custom Wheel of Life assessments are a powerful way to help your customers. They are also useful in sales lead generation and sales follow up scenarios. Every successful engagement starts with self awareness and bench-marking.
A Wheel of Life is a fantastic tool, and there is nothing better than testing it out!
Get started with a free trial and craft your first custom Wheel of Life. Take advantage of the 14 day trial.
We are here to help you be successful.
Create Your Custom Wheel of Life Now
Feeling frustrated with lead generation?
Take this free, 5-minute quiz and get more prospects into your leads funnel.
Instant Results. Actionable recommendations. Email required.
Find Your Score >>